Export Delivery
What Overseas Buyers Should Confirm Before Food Machinery Ships
Pre-shipment confirmation is a controlled handover, not a single photograph of a finished machine. Buyers should connect the approved scope to inspection evidence, accessories, documents, preservation, packing and a receiving plan.

Direct Answer
Before shipment, match each machine to the approved order, verify agreed factory tests and safety checks, count accessories and spares, review drawings and manuals, confirm cleaning and corrosion protection, approve package marks and wood-packaging compliance, and obtain loading photographs plus a packing list. Record open items and owners before cargo is released.
Freeze the approved scope before inspecting
Begin with the signed quotation, final technical agreement, approved drawings and change records. Create one equipment list containing machine names, quantities, identification references and included auxiliaries. Inspection cannot be meaningful if the comparison baseline is still changing.
Separate completed items, approved deviations and open work. An open-item list should identify the action, responsible party and deadline. Do not rely on scattered messages to define what may ship.
Distinguish a FAT from a visual pre-shipment inspection
A factory acceptance test checks agreed functions under stated factory conditions. A visual pre-shipment inspection checks identity, quantity, apparent condition, accessories and packing readiness. They may happen together, but they answer different questions.
Define the protocol before the visit or remote review. State which operations will be demonstrated, what material or substitute will be used, which readings or videos are required and what cannot be verified until installation. A no-load run is useful for basic operation but is not proof of product throughput or finished-food quality.
Confirm machine identity and configuration
Check each machine against the equipment list and current drawings. Review orientation, inlet and outlet positions, service side, product-contact parts, guards, control cabinet, motors and the utilities shown on the approved scope. Photograph identification plates and general views before protective wrapping.
When equipment forms a line, confirm the planned sequence and interface points. A correct individual machine can still cause installation trouble if transfer heights, flow direction or connection responsibilities were not reconciled.
Run the agreed operational and safety checks
Observe start, stop, emergency stop, guards, interlocks and accessible moving parts according to the agreed protocol. Check abnormal noise, obvious leakage and basic control response. Verify that the control interface and selected language match the approved order where this was specified.
Testing must follow the supplier’s safe operating procedure. Energized equipment should be handled only by qualified personnel, and guards should not be defeated to create demonstration footage. Record test conditions so later viewers understand what the evidence proves.
Use representative product only when the test is defined
If a product trial is included, agree in advance who supplies material, how it will be prepared, the target run length, sampling method and acceptance observations. Product temperature, size and consistency should be recorded because they may affect results.
If representative product is unavailable, clearly label substitute-material or water tests. These can verify transfer, circulation or mechanical function but cannot establish all production outcomes. Keep performance statements within the limits of the actual test.
Count accessories, change parts and spares
Lay out loose items by machine and compare them with the packing list. Check tools, screens, knives, molds, nozzles, hoses, clamps, sensors, change parts and ordered spare parts. Small missing components can delay commissioning even when the main machine arrives intact.
Photograph grouped items before they enter a crate. Use item references that appear on both the internal package list and the master packing list. Where parts are removed for transport, record their original location and reassembly method.
Review documents before they are sealed in a crate
Confirm the agreed document set: operation and maintenance manuals, electrical and pneumatic diagrams, foundation or installation drawings, parts lists, test records and commercial shipping documents as applicable. Requirements must follow the order and destination; no universal document package fits every machine or country.
Keep accessible digital copies. If paper copies travel with the machine, protect them from moisture and identify their crate location. Check that revision numbers match the shipped configuration.
Prepare clean equipment for the journey
Remove trial material and cleaning residue, drain trapped water where appropriate and protect exposed machined surfaces, openings and sensitive components. Secure moving assemblies for transport and identify any shipping braces that must be removed before operation.
Protection should suit the equipment, route, duration and storage conditions. Packaging must not create hidden moisture or place unsuitable materials in contact with hygienic surfaces. Photograph the machine after preparation and before the crate closes.
Confirm export packing and ISPM 15 details
Agree the package type, lifting points, center-of-gravity marking where needed, moisture barrier, internal restraint and shock protection. Crate dimensions and gross weight affect freight planning, unloading equipment and site access.
International Standards for Phytosanitary Measures No. 15 applies to regulated wood packaging material in international trade and uses approved treatment plus an official mark. The authorized provider, not an ordinary exporter, applies that mark. Destination requirements and the materials actually used should be checked before packing; do not assume every engineered-wood or solid-wood component is treated the same.
Approve marks, packing lists and loading evidence
Package marks should connect each crate to the packing list and final destination. Review consignee information, item number, dimensions, gross and net weight, handling symbols and any purchase-order references before marking.
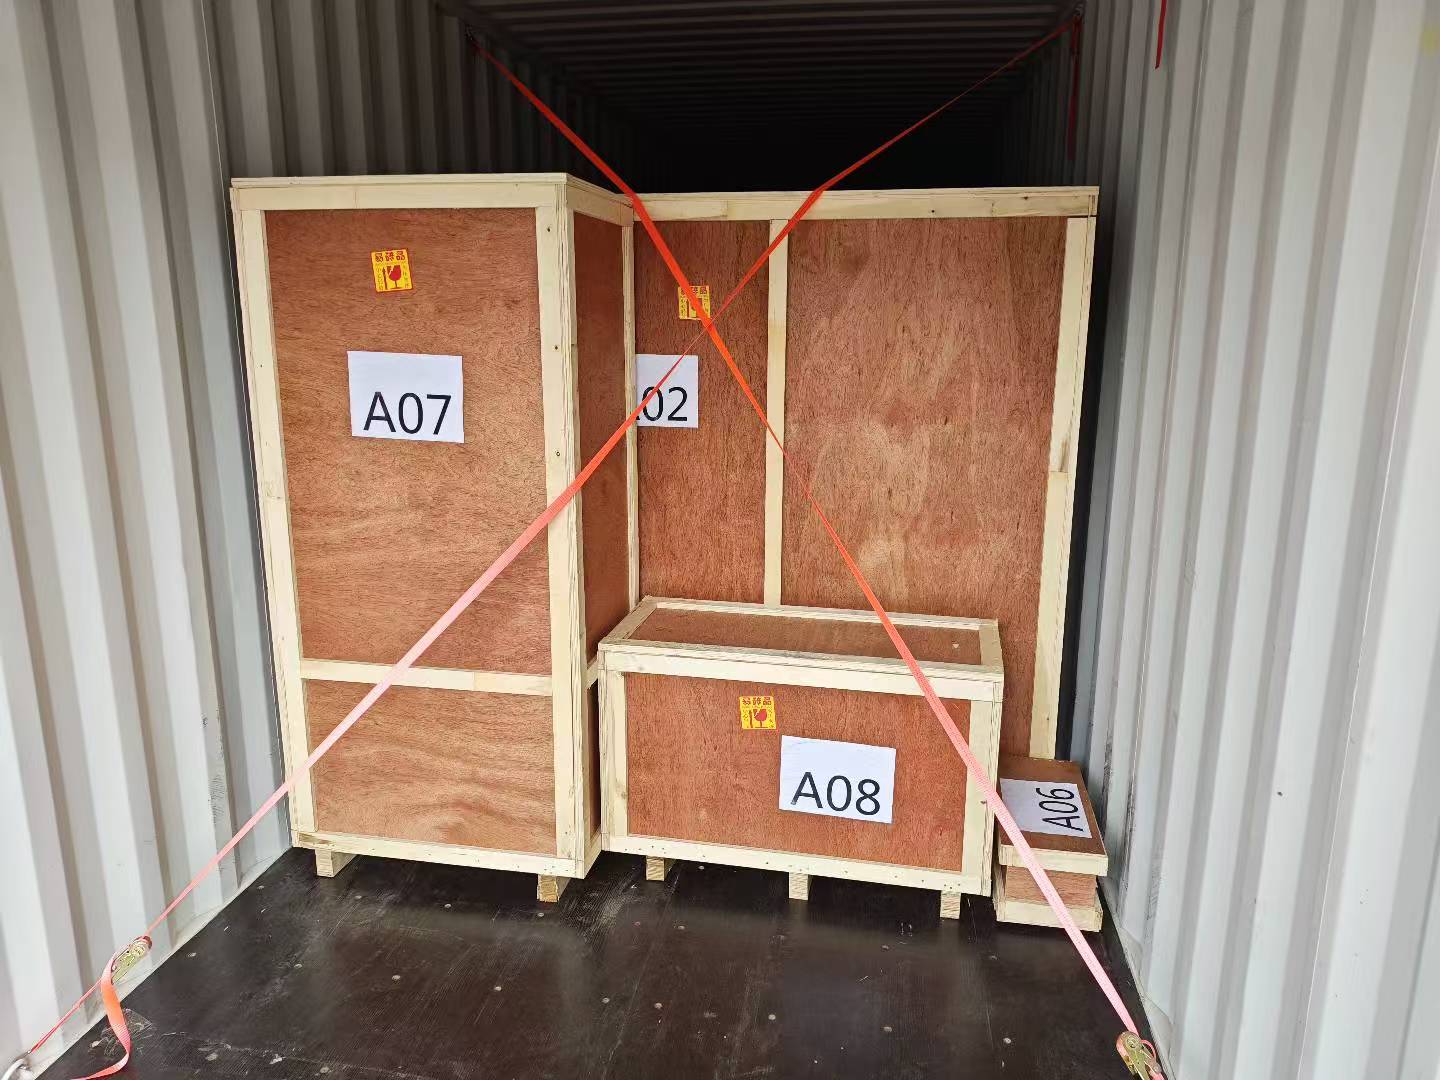
Request photographs showing the empty container condition, packages before loading, restraint or blocking, final placement and container closure where available. Evidence should help the receiving team locate parts and understand how cargo was secured; it does not replace the freight forwarder’s or carrier’s responsibilities.
Prepare the receiving site before release
Use the final dimensions and weights to confirm door clearance, route, crane or forklift capacity, unloading area and temporary storage. Confirm utility work, foundations and installation personnel. A shipment released before the site can receive it may accumulate storage, handling and moisture risk.
Share the packing list with the receiving team before arrival. Identify which crate contains tools, documents and first-installation parts so commissioning does not begin with an unnecessary search.
Turn the handover into one auditable table
The following table can be copied into a pre-shipment record. Add project-specific criteria rather than treating it as a universal acceptance protocol.
| Control point | Evidence to retain | Release question |
|---|---|---|
| Approved scope | Order, drawings and change log | Does the shipment match the current agreement? |
| FAT / inspection | Protocol, readings, photos and open items | What was tested and under which conditions? |
| Loose items | Counted list and grouped photographs | Are accessories, changes and spares traceable? |
| Documents | Revision-controlled digital set | Do documents match the shipped machine? |
| Packing | Protection, crate and mark photos | Is cargo prepared for the route and destination? |
| Loading | Container and restraint sequence photos | Can the receiver identify and unload every package? |
Make remote inspection evidence usable
When the buyer cannot attend in person, plan the remote review instead of accepting a collection of unrelated phone videos. Ask for a stable wide view of the complete machine, then closer views of identification, inlets, outlets, guards, service connections and control response. Use the equipment list as the filming order so every promised item is covered once and file names can be matched to the record.
Live video is useful for questions, but retain original photographs, test files and videos in a shared project folder after the call. Record the date, machine status, test material and people present. If the connection quality is poor, pause the acceptance decision until full-resolution evidence is available; a blurred screen recording may conceal the detail the review was intended to confirm.
A third-party inspector can verify defined points, but the inspection brief must be specific. Provide the approved documents, sampling plan, required photographs and authority for handling deviations. The inspector should not be expected to invent acceptance criteria at the factory. The buyer, supplier and inspector should all work from the same revision and open-item list.
Release cargo only when exceptions are visible
Pre-shipment control does not require perfection in every minor item, but it does require transparent decisions. Record accepted deviations, parts shipping separately, documents to follow and commissioning-dependent checks. A signed release should describe the real status rather than simply stating “passed.”
Send the final release pack to purchasing, engineering, logistics and the receiving site. It should contain the approved equipment list, open-item register, packing list, crate dimensions, loading record and accessible document links. Confirm who will answer questions while cargo is in transit. This short handover prevents a technically complete inspection from becoming disconnected from freight booking, customs preparation, unloading and installation.
Frequently Asked Questions
What is the difference between FAT and pre-shipment inspection?
A FAT demonstrates agreed functions under defined factory conditions. A pre-shipment inspection also checks identity, quantity, apparent condition, loose items, documents and packing readiness.
Can a no-load factory test prove production capacity?
No. It can show basic mechanical or control operation, but product throughput and quality depend on the actual material, process settings and agreed test conditions.
Which documents should ship with food machinery?
The exact set is contractual. Common items include manuals, electrical drawings, installation information, parts lists and agreed test records, plus applicable commercial shipping documents.
What should buyers photograph before equipment is packed?
Capture overall configuration, identification plates, connections, loose items, prepared surfaces, internal restraint, closed crates, package marks and the container-loading sequence.
Does every wooden crate require an ISPM 15 mark?
ISPM 15 covers regulated wood packaging material. Applicability depends on the material and destination rules, and only an authorized provider may apply the official mark.
When should the buyer approve shipment?
Approve release after the agreed inspection evidence is reviewed, open items have owners and deadlines, packing details are confirmed and the receiving site can handle the packages.
Continue Your Research
Tell LACA about your project
Share your material, required output, capacity, destination and any project details available. LACA will use them to begin a focused equipment discussion.